Setting up a JogAmp project in your favorite IDE
These instructions assume that you've created a project in your favorite IDE, and now you want your project to be able to use a JogAmp library like JOGL, JOCL, JOAL, or GlueGen. We use JOGL as an example below, but these instructions work equally well for any other JogAmp library.
Download a JogAmp library
If you haven't done so already, download and extract the JogAmp library you want to use. For example, to download and extract JOGL, see the instructions at Downloading and installing JOGL.
To use a JogAmp library you'll do three things:
- Add its JAR files to the Java classpath
- Add its native libraries in one of two ways:
- Either place its native JAR files in the same directory as the library JAR files
- Or add its native library files(the .dll,.so, and .jnilib files) to the Java library path
- Optional: Associate the *-java-src.zip files with the corresponding JAR files.
Each IDE has a slightly different way to do these things, as we show below. Using the native JAR files is usually slightly easier than using the native library files directly, and native JARs make it possible for all platforms' libraries to coexist in one project, so this is the recommended method.
Please note that all JogAmp libraries depend on the GlueGen runtime libraries. These are included in every JogAmp library for convenience, but are only required once in the classpath and library path of your project.
See JogAmp JAR File Handling, for details on native JAR files and custom JAR bundling.
Maven
JogAmp supports Maven via its the Jogamp Mirror Repository.
From 2.0-rc11 to 2.3.2 and from 2.6.0, packages are pushed to Maven Central.
Please see the Maven page for details on how to use them in your projects.
Gradle
JogAmp supports Maven via its the Jogamp Mirror Repository.
From 2.0-rc11 to 2.3.2 and from 2.6.0, packages are pushed to Maven Central.
Please add the following code into build.gradle to use the version 2.4.0 from the Jogamp test repository:
repositories {
    maven { url "https://jogamp.org/deployment/maven" }
}

dependencies {
  implementation 'org.jogamp.gluegen:gluegen-rt-main:2.6.0'
  implementation 'org.jogamp.jogl:jogl-all-main:2.6.0'
}
Eclipse IDE project
Probably the simplest way to use JOGL in an Eclipse project is to create another Eclipse project to contain the JOGL JARs, then make your project depend on this new JOGL project. In the example below, I include only the 64-bit Windows native JARs, but you can put native JARs for as many platforms as you wish together into the JOGL Eclipse project.
Create a JOGL project
- Put all the JOGL code JARs, native JARs for all platforms you wish to support, and source ZIP files in a directory called "JOGL" in your workspace directory.
- Click "File > New > Java Project". Type "JOGL" as the project name and click "Next".

- Remove the native JARs from the project, leaving only gluegen-rt.jar and jogl-all.jar.

          NOTE: The gluegen-rt-natives-*-*.jar and jogl-all-natives-*-*.jar are not
          required in the classpath by JOGL, but are required by Eclipse to export
          your project as a runnable JAR file.
- Expand the jogl-all and gluegen-rt JARs. For each of them, double-click "Source attachment", click "Workspace...", navigate to the corresponding *-java-src.zip file in the project, select it, click "OK", and click "OK" again to dismiss the "Source Attachment Configuration" dialog. The JARs should look like this when you're done:

- Click the "Order and Export" tab. Check both JOGL JARs, then click "Finish".

Add dependency on the JOGL project
- Right-click your project and click "Properties".
- Select the "Java Build Path" on the left, then click the "Projects" tab on the right.
- Click the "Add..." button, check "JOGL", and click "OK".
- Your dependent project should look like this. Click "OK" to dismiss the "Properties" dialog.

That's it! Your project can now use the library.
Eclipse IDE user library
If you don't want to put JOGL in a separate Eclipse project, you can put it in a user library instead. The drawback to this is that the user library is defined in your .metadata directory and contains absolute paths, so it's hard to share with others. But for a non-shared project this works fine.
Create a user library
- Click "Window > Preferences", then select "Java > Build Path > User Libraries" on the left.
- Click the "New..." button, type "JOGL" for the library name, and click "OK".

- Click the "Add JARs..." button, navigate to the directory where you've stored the JARs, select all the non-native JARs, then click "Open".
- If you're using native JAR files:
- Make sure the gluegen-rt-natives-*-*.jar and jogl-all-natives-*-*.jar files for each platform you want to run on are in the same directory as the other JAR files. The native JAR files don't need to be added to the classpath.
- Expand each non-native JAR in the list
- Double-click "Source attachment", type the module's source zip name, (e.g. jogl-java-src.zip for the JAR file jogl-all.jar), and click "OK".
- If you're using native library files:
- Double-click "Native library location", type the directory where native library files are stored, and click "OK".

- Click "OK" to exit Preferences dialog.
Add the user library to your project's dependencies
- Right-click your project in the Package Explorer and click "Properties".
- Select "Java Build Path" and click the "Libraries" tab.

- Click "Add Library...", select "User Library", click "Next", check "JOGL", and click "Finish".

- Click "OK" to dismiss the Properties dialog.
That's it! You can now use the library in your project.
IntelliJ IDEA
Add a library dependency to your project
- Click "File > Project Structure".
- Select "Modules" on the left, then click the "Dependencies" tab on the right.
- Click the "+" button on the right, then select "Library... > Java".

- Navigate to the directory where you extracted the JARs, select it, and click "OK".

- Click "OK" to dismiss the Configure Library dialog.

- Click "OK" to dismiss the Project Structure dialog. The external libraries in your project should now look like this if you're using native JAR files:

or like this if you're using native library files:

- If you're using native JAR files:
- Make sure the gluegen-rt-natives-*-*.jar and jogl-all-natives-*-*.jar files for each platform you want to run on are in the same directory as the other JAR files.
- Otherwise, if you're using native library files:
- Click "Run > Edit Configurations".
- Type -Djava.library.path=your/path/to/native/library/files in the "VM Parameters" box. Note that paths with spaces must be double-quoted on Windows.

- Click "OK" to dismiss the Run/Debug Configurations dialog.
That's it! You can now use the library in your project.
NetBeans IDE
Create a library and add it to your project
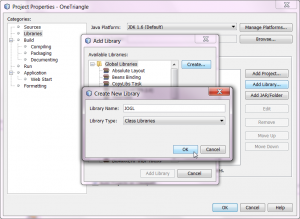
- Right-click your project and click "Properties".
- Select "Libraries" on the left and click "Add Library...".
- Click the "Create" button, then type "JOGL" for the library name and click "OK".
Create library - Click "Add JAR/Folder...", then navigate to the directory you extracted the JAR files, select them and click "Add JAR/Folder".
- Click "OK" to dismiss the Customize Library dialog.
- Click "Add Library" to dismiss the Add Library dialog.

Add library - Click "OK" to dismiss the Project Properties dialog. The libraries in your project should look like this.
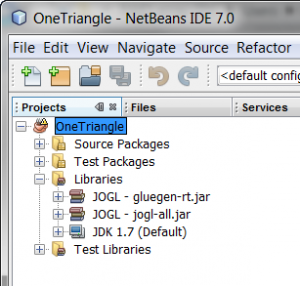
Libraries in project


- If you're using native JAR files:
- Make sure the gluegen-rt-natives-*-*.jar and jogl-all-natives-*-*.jar files for each platform you want to run on are in the same directory as the other JAR files. The native JAR files don't need to be added to the classpath.
- Otherwise, if you're using native library files:
- Click "Run > Set Project Configuration > Customize...". Select "Run" on the left if it isn't selected already.
- Type -Djava.library.path=your/path/to/native/library/files in the "VM Options" box.
- NOTE: If the library path has spaces in it, you must put quotes around it (at least on Windows) or you may get an odd NoClassDefFoundError when you try to run.
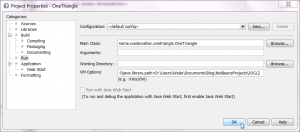
Native library path - Click "OK" to dismiss the Project Properties dialog.

That's it! You can now use the library in your project.
vi and other text editors
Create your project with the editor of your choice
- For example, to open vi, simply type vi and press <return>.
- Type all your code, then save it.
Compile and run your project from the command line
- We assume your JOGL JAR files are in a directory called jar. If you're using native JARs, we assume they're also in the jar directory. If you're using native library files, we assume they're in a directory called lib.
- First compile your program. We assume all your code is in a single file called name/someone/MyProject.java.
- Windows: Type javac -classpath "jar\gluegen-rt.jar;jar\jogl-all.jar" name\someone\MyProject.java
- Linux/MacOS X: Type javac -classpath "jar/gluegen-rt.jar:jar/jogl-all.jar" name/someone/MyProject.java
- Then run your project. We assume your main class is name.someone.MyProject. If you're using native JARs:
- Windows: Type java -classpath "jar\gluegen-rt.jar;jar\jogl-all.jar;." name.someone.MyProject
- Linux/MacOS X: Type java -classpath "jar/gluegen-rt.jar:jar/jogl-all.jar:." name.someone.MyProject
- If you're using native library files:
- Windows: Type java -classpath "jar\gluegen-rt.jar;jar\jogl-all.jar;." -Djava.library.path=lib -Djogamp.gluegen.UseTempJarCache=false name.someone.MyProject
- Linux/MacOS X: Type java -classpath "jar/gluegen-rt.jar:jar/jogl-all.jar:." -Djava.library.path=lib -Djogamp.gluegen.UseTempJarCache=false name.someone.MyProject
That's it! You can now use the library in your project.