Setting up a JogAmp project in your favorite IDE: Difference between revisions
mNo edit summary |
(Added pictures for IntelliJ IDEA and NetBeans) |
||
| Line 35: | Line 35: | ||
* Click "File > Project Structure". | * Click "File > Project Structure". | ||
* Select "Modules" on the left, then click the "Dependencies" tab on the right. | * Select "Modules" on the left, then click the "Dependencies" tab on the right. | ||
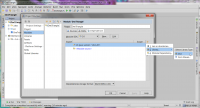
* Click the "Add..." button, then click "Library...". | * Click the "Add..." button, then click "Library...".[[File:IntelliJ_setup_01_add_library.png|200px|thumb|none|Add library]] | ||
* Type "JOAL", "JOCL", "JOGL" or "GlueGen RT" as the library name. | * Type "JOAL", "JOCL", "JOGL" or "GlueGen RT" as the library name. | ||
* Click "Attach JAR Directories...", navigate to the directory where you extracted the JARs and click "OK". | * Click "Attach JAR Directories...", navigate to the directory where you extracted the JARs and click "OK". | ||
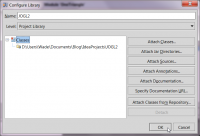
* Click "OK" to dismiss the Configure Library dialog. | * Click "OK" to dismiss the Configure Library dialog.[[File:IntelliJ_setup_02_configure_library.png|200px|thumb|none|Configure library]] | ||
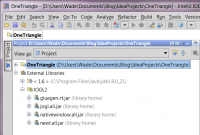
* Click "OK" to dismiss the Project Structure dialog. | * Click "OK" to dismiss the Project Structure dialog. The external libraries in your project should now look like this.[[File:IntelliJ_setup_03_external_library.png|200px|thumb|none|External libraries]] | ||
* Click "Run > Edit Configurations". | * Click "Run > Edit Configurations". | ||
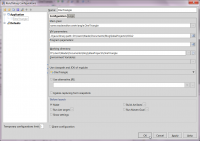
* Type <tt>-Djava.library.path=your/path/to/native/library/files</tt> in the "VM Parameters" box. | * Type <tt>-Djava.library.path=your/path/to/native/library/files</tt> in the "VM Parameters" box.[[File:IntelliJ_setup_04_run_configuration.png|200px|thumb|none|Edit run configuration]] | ||
* Click "OK" to dismiss the Run/Debug Configurations dialog. | * Click "OK" to dismiss the Run/Debug Configurations dialog. | ||
| Line 51: | Line 51: | ||
* Right-click your project and click "Properties". | * Right-click your project and click "Properties". | ||
* Select "Libraries" on the left and click "Add Library...". | * Select "Libraries" on the left and click "Add Library...". | ||
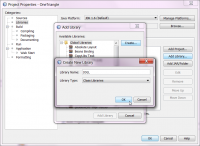
* Click the "Create" button, then type "JOAL", "JOCL", "JOGL" or "GlueGen RT" for the library name and click "OK". | * Click the "Create" button, then type "JOAL", "JOCL", "JOGL" or "GlueGen RT" for the library name and click "OK".[[File:NetBeans_setup_01_create_library.png|200px|thumb|none|Create library]] | ||
* Click "Add JAR/Folder...", then navigate to the directory you extracted the JAR files, select them and click "Add JAR/Folder". | * Click "Add JAR/Folder...", then navigate to the directory you extracted the JAR files, select them and click "Add JAR/Folder". | ||
* Click "OK" to dismiss the Customize Library dialog. | * Click "OK" to dismiss the Customize Library dialog. | ||
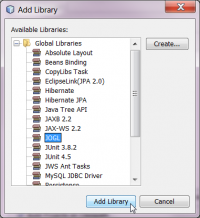
* Click "Add Library" to dismiss the Add Library dialog. | * Click "Add Library" to dismiss the Add Library dialog.[[File:NetBeans_setup_02_add_library.png|200px|thumb|none|Add library]] | ||
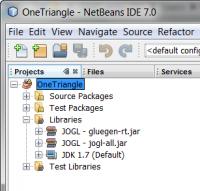
* Click "OK" to dismiss the Project Properties dialog. | * Click "OK" to dismiss the Project Properties dialog. The libraries in your project should look like this.[[File:NetBeans_setup_03_libraries_in_project.png|200px|thumb|none|Libraries in project]] | ||
* Click "Run > Set Project Configuration > Customize...". Select "Run" on the left if it isn't selected already. | * Click "Run > Set Project Configuration > Customize...". Select "Run" on the left if it isn't selected already. | ||
* Type <tt>-Djava.library.path=your/path/to/native/library/files</tt> in the "VM Options" box. | * Type <tt>-Djava.library.path=your/path/to/native/library/files</tt> in the "VM Options" box.[[File:NetBeans_setup_04_native_library_path.png|200px|thumb|none|Native library path]] | ||
* Click "OK" to dismiss the Project Properties dialog. | * Click "OK" to dismiss the Project Properties dialog. | ||
Revision as of 17:18, 25 January 2011
It's very simple to set up a project of your favorite IDE to use a JogAmp library. These instructions assume you've already created a new project in the IDE.
Download a JogAmp project
If you haven't done so already, download and extract for example JOGL as described at Downloading_and_installing_JOGL.
To be able to use a JogAmp library you will have to add the jar files to the classpath and the native files to the library path of your projects run configuration. Please note that all projects depend on the GlueGen runtime libraries which are for convenience reasons included in every JogAmp project but only required once in the classpath/library path of your application.
Eclipse IDE
Create a user library
You can make your new Eclipse project depend directly on all the JARs and native libraries, but it's inconvenient to do that every time you create a new project. Creating a user library bundles all the files together so you can include them in one step.
- Click "Window > Preferences", then select "Java > Build Path > User Libraries" on the left.
- Click the "New..." button, type "JOAL", "JOCL", "JOGL" or "GlueGen RT" for the library name, and click "OK".
- Click the "Add JARs..." button, navigate to the directory where you've stored the JARs, select them, then click "Open".
- Expand the jar in the list, double-click "Native library location", type the directory where native library files are stored, and click "OK".
- Click "OK" to exit Preferences dialog.
Add JOGL to your project's dependencies
- Right-click your project in the Package Explorer and clock "Properties".
- Select "Java Build Path" and click the "Libraries" tab.
- Click "Add Library...", select "User Library", click "Next", check "JOGL", and click "Finish".
- Click "OK" to dismiss the Properties dialog.
That's it! You can now use the library in your project.
IntelliJ IDEA
Add JOGL dependency to project
- Click "File > Project Structure".
- Select "Modules" on the left, then click the "Dependencies" tab on the right.
- Click the "Add..." button, then click "Library...".
- Type "JOAL", "JOCL", "JOGL" or "GlueGen RT" as the library name.
- Click "Attach JAR Directories...", navigate to the directory where you extracted the JARs and click "OK".
- Click "OK" to dismiss the Configure Library dialog.
- Click "OK" to dismiss the Project Structure dialog. The external libraries in your project should now look like this.
- Click "Run > Edit Configurations".
- Type -Djava.library.path=your/path/to/native/library/files in the "VM Parameters" box.
- Click "OK" to dismiss the Run/Debug Configurations dialog.
That's it! You can now use the library in your project.
NetBeans IDE
Create a JOGL library dependency
- Right-click your project and click "Properties".
- Select "Libraries" on the left and click "Add Library...".
- Click the "Create" button, then type "JOAL", "JOCL", "JOGL" or "GlueGen RT" for the library name and click "OK".
- Click "Add JAR/Folder...", then navigate to the directory you extracted the JAR files, select them and click "Add JAR/Folder".
- Click "OK" to dismiss the Customize Library dialog.
- Click "Add Library" to dismiss the Add Library dialog.
- Click "OK" to dismiss the Project Properties dialog. The libraries in your project should look like this.
- Click "Run > Set Project Configuration > Customize...". Select "Run" on the left if it isn't selected already.
- Type -Djava.library.path=your/path/to/native/library/files in the "VM Options" box.
- Click "OK" to dismiss the Project Properties dialog.
That's it! You can now use the library in your project.
Vi
Open a shell of your choice
$vi <return>
That's it!
